 ...
... 
Cub by Skip Pothier Seamaster by Ted Curl
Introduction
Flying off water brings a new dimension. Usually the scenery is a lot more pleasing and the noise levels seem to be much lower. The type of pilot who flies off water is usually a pretty calm type of person and water sites are usually a bit more remote and picturesque. A lot of spouses will go to a fun float fly whereas they wouldn't dream of attending a field setting. It is more like a picnic at the lake.
There is a mistaken belief that it is a lot harder to be a good seaplane pilot. Actually, once you get the hang of it, flying off water is usually easier. Just think, the runway is very long, wide and flat. Equally, there are no balsa magnets just beyond the grass waiting to snare your plane. The aim of this article is to take some of the mystery out of the hardware and techniques of this unique pleasure.
Type of Plane
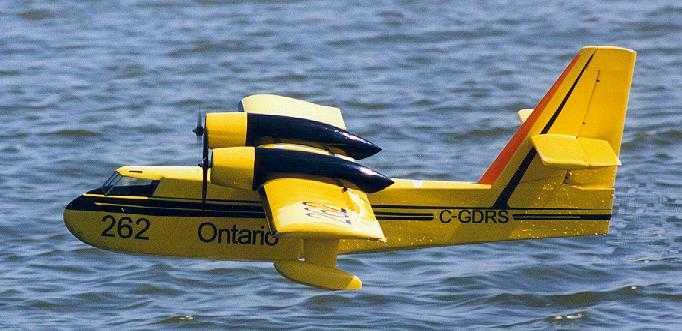
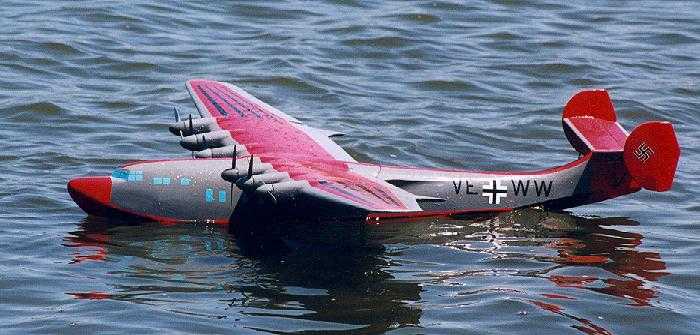
There are two basic types of planes that fly off water. Float planes, that are usually converted wheeled aircraft, and flying boats that have a boat-like hull. The planes shown below have glow engines.
...
Cub by Skip
Pothier
Seamaster by Ted Curl
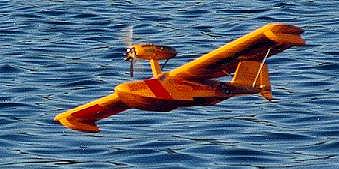
Flying Boats
Model flying boats have three major points to check. If the engine is mounted on a pod above the wing, it might need as much as 3 degrees of up-thrust to achieve balanced performance. Notwithstanding, designs like the Seadancer, Seamaster and Sea Cruiser have a neutral thrust line.
The floats at mid-wing or wing tip can present a problem if they have too little buoyancy and/or they are too narrow - in both cases they will tend to dip under the water and cause the plane to go in circles due to excess drag.
While some seaplanes with low stabilizers work well, T-tails or mid-fin stabilizers are usually best to prevent the stabilizer from hitting the water under less than ideal conditions.
If you can afford a dedicated water bird, then a flying boat design is much easier to handle and does not require any significant increase in engine power to overcome the drag that floats and attendant rigging induce. Flying boats are significantly more aerobatic than float planes in that they don't have the extra large mass under the fuselage to cause "pendulum effect". Finally, they can handle higher winds on the water better than float planes.
If you are a novice, don't try to pick the plane that looks nice in the catalogue. Ask experienced pilots which design works best for your situation.
Electrics
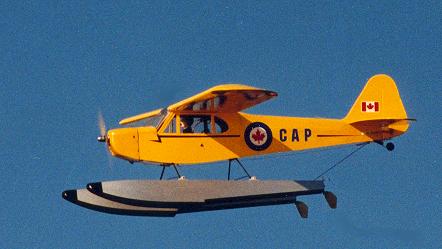
Electrics really come into their own on water as multi-engined planes are
relatively easier to handle than their glow-powered equivalents. Those
with sharp eyes might detect that the CL 215 has no water rudder. Steering
on the water is handled by adjusting the thrust of each engine!
 .........
CL-215 by Robert
Pike
Potez-Cams 161 by Laddie Mikulasko
From a beginner's point of view, the flying boat is easier to handle. However, most beginners want to dip their toe in the water just to see if they like it; therefore, it is usually easier to convert an existing wheeled plane. For the remainder of this exercise, only float planes will be discussed.
Overview
So what are the things to consider. As an overview, the list is:
* you need to choose which type of
airplane to convert
* you need
some floats
* you have to
construct the mounting gear for the floats
* you need about 20% more power to overcome the water friction
and suction
* you want raw
hauling power rather than top speed - lower the pitch of the propeller
* you should waterproof critical
components
* you need to
determine the step position
*
you have to adjust the relative angle between the floats and the fuselage datum
line
* you might need to add a
ventral fin to increase fin area
* you need water rudders for on-water taxiing.
* you need a place to fly with a
recovery boat
* you need to
learn a little plane handling technique
Type
Just about anything can be made to fly off water on floats, even a real Supermarine Spitfire. However, most models that you see are more sedate. Cubs are the single most popular choice, followed by the venerable Beaver and Norseman. Basically, a flat bottom or semi-symmetrical airfoil type is best for beginners.
All things being equal, it is desirable to choose a plane with a slow stall speed as this eliminates a bit of risk if you take off too soon.
As a first effort, you might well want to take your trusty trainer, although you probably will want to increase the horsepower.
Floats
There are three ways to acquire floats. You can buy pre-built plastic floats from the hobby shop. Equally, you can buy kits to create built up floats (hollow) out of balsa and light ply. Lastly, you make your own starting with a foam core that is covered with balsa sheet and finished with either film covering or fibreglass, epoxy finishing resin and paint. The choice is yours, but the aim is to get something that has enough buoyancy for the weight of your plane and to remain leak proof even when submitted to a bit of punishment.
Float Cradle
With the exception of the plastic floats, the bottoms of your floats are quite soft and easily damaged. A cheap and simple idea is to build a float cradle. Take four pieces of wood about 3/4 inch square. The width needs to be about six inches wider than your floats, while the length is just an eye appealing symmetry. Assemble the wood in a square with the two width members on top. We need to nail the pieces together so that the nail heads protrude about an eight of an inch. Drill a hole at the four intersections to accept the nail and to prevent the thin wood from splitting. Push three quarter inch foam water pipe insulation over the two width members. Put carpenter's glue or epoxy on the four corners and insert the nails. Clamp and let dry.
When transporting the aircraft, put the cradle in the back of your vehicle on a piece of carpeting or use the vehicle carpeting. Lay the floats on the foam to prevent damage. At the flying site, use the foam cradle when you are working on your aircraft.
Engine
Both 2 cycle and four strokes work well. The 2 cycle is lighter and may be more practical for smaller models. It is also less prone to damage when it eats water. The four stroke has the low end torque that is so useful for float flying. Nothing sounds better over water than a four stroke.
In both cases, you will need about 20% more power than the equivalent wheeled requirement. As a rule of thumb, go one size bigger. So, your 40 powered trainer will need a 46 to get off the water.
Some people advocate adding a safety wire to the engine so that it does not sink to the bottom of the lake if the engine is torn off in a major crash. This seems to happen more to aircraft with the engine mounted in a slender pod above the wing. The idea is to secure one end of a braided wire tether to something fairly solid that will survive a crash, and the engine mounting bolts to the other end.
Propeller
As a general rule, never use wooden propellers when flying off water. They will shred almost instantly when hitting water. Advanced flyers know how to paint wooden propellers with epoxy finishing resin that then makes a wooden propeller feasible. For most applications, a solid plastic propeller, such as the APC brand, works well.
You will find that dropping the pitch one size will give you much better lift off capability.
Propeller Tip Clearance
We do not want water sucked up or splashed up into the propeller disk. As a rule of thumb, make sure the propeller clears the top of the floats by one inch or more.
If you find a clearance problem, you could change to a three-bladed propeller. Usually, a ten-inch diameter three-bladed propeller would replace an 11-inch diameter two-bladed propeller.
Splash Rails
To minimize spray hitting the propellers, some like to install splash rails on the tip of the floats, from the nose back to the propeller line. These rails need only be on the inside edges. A one-third inch wide strip of clear plastic sheeting embedded roughly parallel to the water, following the curve of the float and fixed into the float body with epoxy seems to work well.
Waterproofing
Most glow engine aircraft are pretty waterproof, but there are some special considerations. When a plane tips over in the water, it generally comes to rest with the engine submerged and the fuselage pointing skyward at a 60 degree angle. Water tends to creep in through the wing saddle and the canopy.
You should paint exposed balsa in the fuselage cavity with varnish to make it waterproof. You need to wrap your receiver in plastic to prevent damage. One ingenious method is to take a rubber surgical glove, nick holes in the ends of the fingers and thumb, pass the servo leads and antenna through these perforations, seal up the small holes with waterproof glue and place the receiver in the palm of the glove. Tightly wrap a rubber band around the wrist of the glove and encase the package in latex foam rubber. Caution: Do NOT use silicone sealant as it contains chemicals that attack electronics.
Caution: Do not wrap your NiCad battery pack in any impervious material. First, any watertight wrapping will cause the battery to overheat when you charge it and damage will result. Second, there is a small vent hole in a NiCad cell that allows gases to escape - a vapour barrier will trap these gas and lead to cell deterioration. The battery pack, wrapped in the normal latex foam vibration absorber will be waterproof enough for our purposes.
Where the wing mates with the fuselage, you must take some steps to keep the water out. There are three common methods to accomplish this. Along the line of the wing saddle, you could glue a thin rubber, ribbed weather stripping commonly found in hardware stores. Alternatively, you might laying down a bead of silicone sealant on the saddle and drop the wing (covered with plastic wrap) onto the saddle, let the bead dry and remove the plastic once the sealant has cured in the desired shape. A third method is to simply put the wing on, sealing the gap with a bead of Vaseline.
Rudders
In anything less than the lightest breeze, it is impossible to control the taxiing of a float plane on water. You will need rudders and two are always better than one. The rudders should be rigged for maximum deflection left and right, as steering at low speeds will require the extra bite. You can buy Ernst plastic rudders in 40 and 60 size. You can easily make your own out of thin metal.
Rudders should swing upwards out of the water for two reasons. First, as you approach take-off speed you do not want rudders to have any steering effect, nor drag for that matter. Second, when you taxi back to the beach, you want the rudders to fold back to prevent strain on your steering set-up.
The water rudders have to work in harmony with the air rudder. The easiest and cheapest rig is to put a double barred servo arm on the rudder servo. That is, the arm length is equally long on both sides of the pivot point. Tie two lengths of light nylon fishing line to each side of the servo arm. Glue a small length of fuel tubing into the bottom of the fuselage, canted towards the rear.
On the top of the floats, about twelve inches from the rear install small metal guide loops. On the water rudder steering arms, attach four nylon clevises. Bring the four lines out through the tubing, down through the metal guide loops and thread them through the appropriate clevis on the water rudder steering arms. Ram a piece of wooden toothpick into the clevis neck to secure the line. Tighten the fishing line and test the water rudder movement. When all is smooth, put a drop of thin CA on the wooden toothpick to secure the line. Cut off any extra line.
An alternative, which makes it quick to change from water to land gear, is to drive the rudder with a separate ball link from the rudder horn, with either a piano wire directly to the rudder or with a sleeve and cable run under the fuselage and looped back along the top of the float to the rudder horn. Dual rudders can be linked with a cross rod.
Larger applications may require a servo mounted directly on or recessed into one float.
Ventral Fin
A plane with a long enough tail moment and large enough tail feathers can get away without a ventral or sub-fin. That is why Cubs and most trainers are nice. More scale type aircraft, such as a Beaver, are short coupled and usually need the fin. Why?
The floats add a huge slab of hull that reacts against side winds. The effect can be so bad that the plane literally forgets which way is forward and starts to weathervane into the side wind. This can be prevented by adding a removable ventral or sub-fin on the bottom of the fuselage under the existing fin. This will increase the effect of the tail feathers and keep the plane going in a straight line.
Another trick, but more permanent, is to add small finlets to each side of the horizontal stabilizer. This also increases the area of the fin.
One indication of inadequate tail moment is to taxi downwind and reduce to idle. If the plane doesn't turn its nose into the wind, the vertical fin area isn't big enough and a ventral fin should be added.
The Step
The step is that notch in the bottom of the float. If you look carefully, you will notice that the bottom of the hull slopes upwards at about 3 to 5 degrees behind the step. This allows you to rotate the aircraft for take off and landing without the back of the float digging into the water. If the rear of the float drives down into the water, drag will increase and no lift-off will occur.
As the aircraft increases speed on take-off, the float rides up onto the step and a huge amount of suction is eliminated. Nothing is more important than getting the step in the right place.
In general terms, the step should be under the centre of gravity or about one half an inch to the rear of the centre of gravity.
Balance
When constructing your floats, you should try to get them to balance at the step. The step will subsequently be positioned close to the centre of gravity of the aircraft.
If the centre of gravity of your "wheeled" aircraft changes when the floats are added, always add the balancing lead to the nose (or tail) of the floats for two reasons.
First, the noses (tails) are furthest out and provided the greatest leverage for the least amount of lead. Second, when you take your floats off and go back to wheeled flying, you won't have to rebalance the plane.
Attachment Gear
You have to decide whether you are going to retain the existing wheeled landing gear and adapt it to the floats or whether you are going to take off the wheeled gear and create a totally new mount.
If you keep the existing landing gear, you will have to insert some hard points in the rear bottom of the fuselage at a point about half the chord width behind the trailing edge. These hard points will anchor a rear landing gear support that might be a bit lighter, but similar to the front gear. If you are going to strip off the landing gear, then you will need hard points front and rear and a solid support geometry to support the floats that does not twist or bend.
If you retain the landing gear, think of using nylon nose wheel steering blocks as quick mounts on the floats so that you can switch back and forth between floats and wheels quite easily.
Float Angles
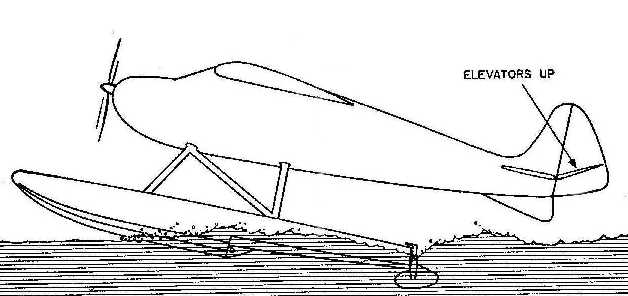
This subject is very tricky, but is the cause of some maddening moments when float flying. There are some planes that simply do not seem to want to take off, even though everything looks right. That is because the problem divides itself into two major components. First, the static part that relates to the angle between the airfoil and the floats and second, the dynamic way in which the floats run on the water and affect the angle of attack of the airfoil.
The wing chord datum line (the line through the centre of the leading edge to the centre of the trailing edge) to the float datum line (for our purposes the line along the flat top of the floats) is static and is fairly easy to understand. In the case of flat-bottomed airfoils, these two lines need to be parallel. The simplest way to check this is to place a straight piece of wood under the airfoil, front to back, and check to see if it is parallel to the float top.
With other airfoils, the float tip angle can be about one or two degrees down from the fuselage datum line; that is, the distance from the wing leading edge to the top of the float is slightly more than the distance from the trailing edge to the top of the float. In rough terms, with most trainers, this usually means about one half an inch.

The aircraft in the photo above is a real Arctic Tern. Take careful note of the datum line running through the length of the fuselage and its relative angle to the line running along the top of the float. That works for this specific aircraft. Other aircraft do not require the same dramatic float tip droop.
With some airfoils and aircraft configurations, the incidence may have to be adjusted one or two degrees negative or positive for best results. Note that there is as much "art" as "science" to float flying!
Another school of thought suggests that setting the float tops at the same incidence as the stab works well. It is a simpler way to explain it. This holds the wing at the normal flying angle of attack and presents the floats at the least frontal area. Since the drag of the floats may require an adjustment of the Angle of Attack, in effect changing the stab incidence through elevator trim, it may be off a bit but probably no more so than other approaches.
Most fliers can stop right here, but for the problem cases a further explanation is offered. That is, we must also consider the dynamics of planing action on the water. Dynamically, during landing and take off, there is the wing incidence in relation to the planing level of the floats. Most particularly on take-off when the floats come up on the step, it has to be about 2 to 4 degrees positive. If it is too little, the plane will not take off. If it is too much, the plane will take off too soon and stall.
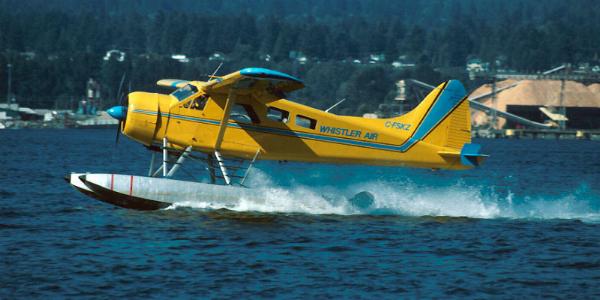
Photo by Stefano
Pagiola
This angle will be affected by, among other things, the wing to float incidence, the size of the step, the length of the float behind the step and the degree by which the tail of the float diminishes towards the rear. This is the dynamic portion.
The good news is that you don't need to know most of this. Float designs, which affect the planning action, are pretty standard and take care of the complicated stuff. Just get the static angles right and make sure the step is in the right place. Most people flying standard models will never have to worry about the dynamic side of the equation. There will always be a local expert who can diagnose the problem plane.
Walter Lawrence, who cuts foam cores professionally, has published recommendations indicating that high wing planes have a static angle of 1 degree positive, while mid-wing and low wing machines set up at 0 degrees to the floats.
Going back to high school trigonometry, if the wing chord (the line running from leading edge centre to trailing edge centre) is 10 inches, then the tangent tables for 1 degree (10 times 0.01746) suggest the leading edge is further from the float tops by 0.1746 inches than the trailing edge, or with a chord of 12 inches, 0.2095 inches. The reader is left to deduce how many popsicle sticks make up these fractional amounts.
Float Nose Protrusion
The noses of the floats need to protrude beyond the propeller anywhere from one half to one third the diameter of the propeller. Thus, if you are swinging an eleven-inch propeller, the noses should jut out about four inches. This ensures that there is enough flotation up front so that when you apply throttle, the noses don't submerge and you don't get into RC submarine operations.
Flaps
If ever there was a time to put flaps on a plane, it is for flying off water. Flaps make take-offs and landings so much easier that it is hard to sing their praises loudly enough.
Flying Technique
When flying off water you must become much more aware of the wind. It affects taxiing as well as take-off and landing. Left alone, a plane on water will always weathervane into the wind. If the wind is too strong, you may have no control other than going straight into wind. You can use the weathervane effect to your advantage. To get lined up for a takeoff into wind, taxi out and then drop to a very low idle. The wind will line you up automatically!
Taxiing becomes a little like sailing; you must judge your turns according to the strength and direction of the wind. Flat bottom, high wing machines are notorious for flipping over if you let the wind get under the wing when turning down wind. You must learn to use aileron to lean the plane into the wind. Even with the engine off, the wind can be used to "sail" the plane back to shore. You might need to talk to a sailor to understand this notion.
Always take off and land into wind. With a wheeled aircraft taking off from the grass, you can get away with cross wind techniques. Those large, draggy floats and the extra weight make it very tricky to take off cross wind. It can be done, but the tendency is for the plane to lift off and immediately cartwheel into the water on the down wind side as that float will still be in the water creating drag when the upwind float is airborne.
Local shoreline configurations, tall trees or buildings can change wind patterns quite dramatically. It is a natural tendency to assume that the wind is 90 degrees to the parallel line of waves. Be very aware that this is often not the case. Make sure you have a small piece of light yarn on the tip of your antenna to act as a "tell tale" as to probable wind direction - then again, be conscious of the fact that what you see at your antenna tip is not a guaranty of the actual wind at your take-off point. Watch other flyers taking off and observe any tendency to roll to one side on take-off. The roll will be to the downwind side.
When taking off, taxi to position using the rudder. When lined up, apply full up elevator and apply throttle. The object is to get the floats lifting up onto the step. As soon as you see the plane up on the step and an increase in speed, relax the elevator to neutral. As you approach full speed, try not to use rudder at all, and if you have to, do it sparingly. Too much rudder and the float tip on the inside of the turn will dig in and you will flip before you know what happened. Close to full throttle, gently apply up elevator until the floats leave the water. Then level out to gain airspeed before completing the climb out.
On the take-off run, two forces can cause the plane to go airborne. Hydrodynamic forces, caused when you hit a wave, can launch your plane before it is ready to fly aerodynamically. The craft will stall and cartwheel into the water. Hence, be careful not to have any up elevator on until the plane is almost ready to fly.
Landing a float plane is easier than a wheeled plane. First, the runway is very long and second it is very flat. Just line up and ease back on the throttle to set up a shallow, sinking approach that is a bit faster than the land version. The extra weight of the floats will make it stall earlier and the increased drag will cause the plane to slow down more quickly. When over the threshold, ease back on throttle and hold it off about three inches above the water. It will land itself. Taxi back using aileron and elevator to balance any strong wind.
Crashing
When you crash on water, the structural damage is usually less severe than hitting terra firma. Water damage is a major concern; but, provided you waterproofed reasonably well, it is just a matter of swallowing your pride, getting the recovery boat and picking up your wayward friend.


Usually your craft will be floating upside down on its wing, with the engine submerged. Often, a small amount of water will leak into the upper wing saddle cavity. NEVER, NEVER, NEVER turn the craft right side up. The water will drop down inside and dampen all that is still dry. Turn off the receiver and get the plane back to land upside down, take off the wing and let all the water drain out.
The engine will have ingested water. The piston will now be in hydraulic lock. You cannot compress water and if you try to turn the shaft you will probably snap the connecting rod. Simply take out the glow plug and let the water drain out. Squirt a bit of fuel into the cylinder and flood the case through the carburetor. With the glow plug still removed, turn over the crank by hand and make sure the muffler drains as well. Setting the plane right side up, you can then give the crank a whirl with your electric starter, making sure to keep your eyes out of any spray coming from the glow plug hole. While all this is going on, you can hook your glow plug up to its electrical driver to dry it out. Put in the glow plug and start the engine as soon as possible. The heat from the combustion will purge all water and the lubricant in the fuel will coat the bearings. The worst thing to do is nothing and let water rust the bearings.
In June 2001, four more valuable lessons were learned. The Beaver on floats was deliberately put into an inverted spin, but would not come out - only the rudder was having any effect. It hit the water going straight down. The windshield blew out and the fibreglass cowl exploded - imagine going off the high board with your mouth open! All was repaired in a couple of days. But, the impact was so hard that the clunk was driven to the top forward part of the tank and the glow element bent into the plug wall thereby dissipating the heat from the element.
Lessons learned:
1. Drain the tank
and shake the plane to make sure the clunk is free.
2. Examine the glow plug coil to make sure the helix is
still centred.
3. The pendulum
effect of floats makes extreme aerobatics tricky. Go high - really
high!
4. If it had hit land, the
Beaver would have been balsa dust - crashing into water can be safer!
If your receiver got wet, do not mess with it. Take off any wrappings and lay it out in the sun to dry. If it got really damp, your day may be over. Never fear though, once dried out, it will be just fine. However, if you were flying off salt water, the news is probably very bad. The saline solution will damage the electronics very quickly.
Fuel Supply
Something to remember is the fact that low fuel level in the tank will allow the clunk to become uncovered when touching down on rippled water. It is better to land with a third of the tank full to prevent fuel slopping and subsequent engine failure - followed by that long row of shame to retrieve your plane.
Safety
At the slightest indication that there is lightning in the area, stop float flying. Nothing can make a more attractive strike target than a pilot standing in the open holding a box with a metal radio antenna pointed skyward.